
10 Editing Tips for Organizing Your Video Project
You’ve done your pre-production research, shot hours of beautiful footage, and captured meaningful interviews. Now, it’s time to edit a concise video that is both engaging and informative, while meeting all necessary criteria.
For some, this is the fun part. For others, it’s incredibly overwhelming. If you’re the latter, here are a few simple organizational tips that make the editing process a bit less daunting.
Create Your Folders
Let’s start at the very beginning (I hear it’s a perfect place to start). It may seem like common sense, but creating labeled folders for each aspect of your video will keep your project organized, and make assets easier to find. Create a folder for footage, including subfolders for each camera and/or stock footage used. We also suggest creating a folder for project files (i.e., Premiere, After Effects, Final Cut, Resolve, etc.), as well as separate folders for graphics, audio files, music options, and project exports.

It’s important to have all assets for a project in labeled folders first, before importing them into editing software. This distinction will keep file pathways consistent and prevent the need for relocating files during the editing process.
2. Create Your Video Project
Picture this: you spend hours editing a video, hit save, and close your project to take a much-needed break. Everything seems great until you attempt to reopen your project and realize your saved file is nowhere to be found. After hours of panicking, you realize you accidentally auto-saved your project into an entirely different folder. While the project may be found, the hours searching for it are lost forever.
In order to avoid this issue, it’s essential to double check all project settings before editing begins. After opening your editing program, take a look at your ‘Save As’ settings and make sure it’s saving to the correct project files folder you created within your project. Additionally, make sure your sequence settings will work properly with your footage (i.e., matching frames per second and file format with the settings.)
If you’re working with high-quality files, and/or multiple codecs, such as Drone or 4k footage, it may be beneficial to create proxies. Proxies are low-resolution video files that act in place of larger-resolution video files in your timeline. By changing ingest settings at the start, you can automatically create proxies while simultaneously importing your footage. Proxies allow for faster rendering, a process that creates new preview files for your editing software to reference, which makes editing footage significantly smoother.
3. Label Your Sequences

Depending on the project, it’s helpful to create separate sequences. For instance, if you have multiple interviews, create and label a separate sequence for each person. Ensure you drag all camera angles and audio sources into respective timelines. Make sure you double check your sequence settings as sometimes they will automatically change to match the settings of the first clip you dragged in.

Sync up your footage with external audio, either by using the synchronize tool or looking for audio peaks created from slating. If slating didn’t occur, search for any distinct audio peak (i.e., a loud cough, hand clap, etc.) in order to line up in-camera audio with external audio. Additionally, create a master sequence where the full video will be edited.
4. Color Code Your Footage
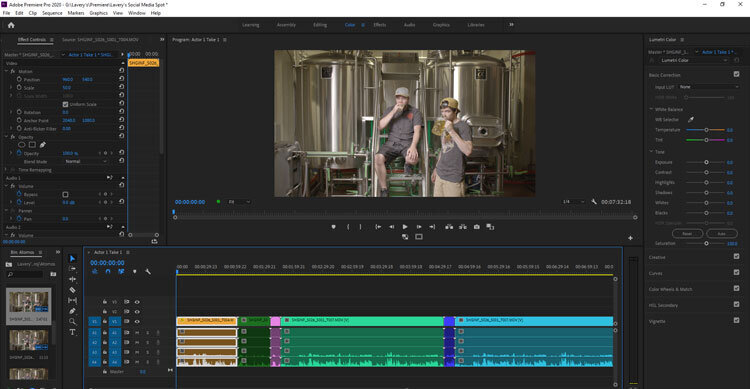
Nearly every editing software has an option for color coding footage. What the color-coding signifies is up to you. For instance, if you are working on a project with multiple interviews, it can help to color-code each person. This labeling can help keep track of who is speaking and give a visual representation of how much screen time is allotted per person.
Alternatively, you can use the color coding function to label each camera if multiple angles were used during production. Applying these labels helps with color correction down the line, as different settings may need to be applied to different cameras.
If you color code footage within its bin, all the files will automatically be colorized when you drag them into a timeline. However, you can also color code individual clips within a timeline, without affecting the rest of the respective footage.
Color me surprised, but color coding became an organizational game-changer for my workflow.
5. Look And Listen

Once all settings are set, and labels are labeled, it’s time to listen and watch through your footage. If working with interviews, it’s crucial to actively watch through the footage in its entirety and label soundbites using a marker tool within your timeline. The marker tool allows for summarizing and pulling soundbites and can help for quick referencing when choosing talking points for your master sequence.
If you’re working strictly with b-roll, or have an abundance of footage, it helps to sort files into labeled bins. This strategy can be as generalized as organizing footage into exterior and interior shots, or as specific as grouping footage by action, subject matter or camera movements.

6. Make Your Selects
Once you’re familiarized with the footage, begin pulling usable soundbites and shots into your master sequence. This will form the storyline of your project. Pull full soundbites to start, watching through and trimming the excess as you go. If you’re working strictly with b-roll, begin pulling usable shots, trimming your shots to match a voiceover and/or music in later steps.
Make sure to place different camera and audio tracks on their own line within the sequence. This organizational strategy can help with color correction and audio mastering down the line, as you’re able to apply effects to an entire line, instead of clip by clip.
7. Trim The Fat
Once you’ve made your selects, begin trimming out the excess. In terms of soundbites, this can mean cutting out “um’s,” throat clears, long pauses, and repetitive explanations. In terms of b-roll, this can mean cutting out accidental camera movements or repetitive shots.
To avoid sound pops, add crossfades to soundbites to give a more seamless effect and hide obvious cuts.
8. Time For Tunes
Let’s be real; most of us don’t have access to symphony orchestras who score the project for us. Instead, you can opt for royalty-free music. Using music in your films is highly recommended, as it helps set a tone and emphasize points throughout your video. It’s important to give yourself a variety of songs to choose from, as there is a multitude of royalty-free music sites where you can search by genre, instrument, and tempo to find the perfect fit for your project.
If your film has a decent amount of interviews or voiceover, it’s important to find songs that won’t compete with the voices, but still have distinct musical beats that will carry the narrative. Try roughly laying a few different tracks into your master sequence to see which works best against the voices and conveys the correct mood. As mentioned earlier, make sure to lay the music into its own audio track.
9. Make The Cuts
Once you’ve selected your music, you can begin cutting b-roll and interview shots to musical beats. Cutting on specific beats gives purpose to shots as well as emphasizes specific talking points depending on musical cues.
If your interviews are shot in 4K, and you’re in a 1080p project timeline, now is the time to begin scaling in and out, opting for closer framing on emotional beats, and wider framing on broader topics. If adding lower thirds over interviews, make sure to leave a person on screen long enough for a viewer to read their name and descriptor.
10. Walk Away
Once you’ve laid in all your footage, audio, and music, it’s time to take a step back. If you have the time, give yourself at least a day before watching back through your project. Taking yourself out of editing mode and coming back to a project with a clear head can help you see problems or issues you might not have noticed before.
Similarly, get advice from an unbiased source. Ask for feedback on pacing as well as effectiveness of messaging. In general, be prepared to cut at least 5-10% out of your final video in order to maximize conciseness. More often than not, a person has more video than they need. But this is a great problem to have! It’s always better to have too much footage than not enough.
If you lay the groundwork for a well-organized project, you will greatly ease the flow of post-production from here on out. From story editing, to color correction to audio mastering and special effects work—a well-organized project can help you avoid a multitude of pitfalls, while making project trade-offs between team members that much more efficient.
Organize now, and your fellow teammates, not to mention your future self, will thank you later!